DC Machine
Introduction:
DC Machines form one of the varieties of electrical equipment and are extensively in use in various industrial applications like DC voltage generation, electro- plating, metal extraction, traction, steel industry, paper mills etc. While the performance analysis and design features have been considered already, given the design data, this chapter deals as to how to make drawings of parts, sub assembly and general assembly. The input data for making the CAD drawing may be in the form of wordings, sketches or both.
Te following are the parts of DC machine-
1. Yoke- Housing- Casing
2. Poles- Main Poles- Inter Poles- Compensating Winding
3. Armature and Armature Winding
4. Commutator
5. Brush and Brush Holder
6. Fan
7. Bearing
8. End Shields
9. Lifting lug
The general appearance (Figure-1), a dismantled view (Figure-2), an exploded view (Figure-3), a general assembly (Figure-4) and a sectional pictorial view (Figure-5) of DC Machine are given below, to familiarize with the various parts and their relative position in the machine-assembly.
Yoke and pole with winding constitute stator and armature with winding and commutator form the rotor. The brush and brush holder assembly is used for supplying or collecting current from/to the machine. The other structural parts are end shields, bearings, fan, foot and terminal board. The drawing of active parts is given prominence. However, knowledge of other parts also, will greatly help in assuming data require for completion of drawing.
Pole and Yoke Assembly:
The pole is made up steel laminations of 1.2 mm thick as shown in Figure-6. The laminations are assembled to the required length and then riveted to form a solid core. The central hole is the driven with steel rod. The longitudinal holes in axial view are two in number. The bolts are driven through yoke, pole and then to the central rod. The yoke is shown in Figure-7. If the dimensions are given for pole/yoke, the CAD drawings can be made.
Figure-7, Details of Yoke
Problem-1
Draw the Pole and Core Assembly of a DC machine with the following data – Rating: 10 HP, 1500 RPM, 4 Pole, DC Motor
Radius of Pole: 115mm Pole Length: 210 mm
Pole Width: 76 mm
End Stamping: 5 mm thick
Pole Arc/Pole Pitch = 2/3 Yoke Thickness: 20 mm
Use Suitable bolts for fixing the Pole Brick to the Yoke. Hints: Prepare a preparatory sketch, using the data-
End plates of 5 mm thick are to be shown. (This is to prevent the bulging of stamping)
Using commands, prepare the drawing. For solution see Figure-8 .
Preparatory sketch for Problem-1
Figure-8, CAD drawing for Problem-1
Problem - 2
Draw the pole and yoke assembly of the DC machine with the following details- Pole radius = 345, Pole arc = 210,
Pole Height = 145, Pole width = 127 Yoke Inside Diameter = 345
Yoke thickness = 55
4 Nos. of rivet, 12 mm diameter
2 Nos. of Bolts, M20
All dimensions are in mm.
Preparatory sketch for Problem- 2
Figure-9, CAD drawing for Problem-2
Problem-3
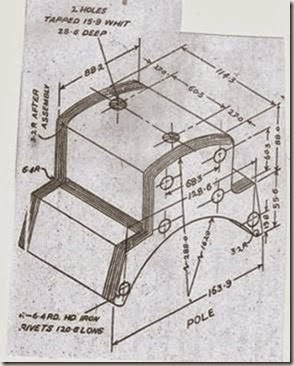
The isometric view of a Pole of a DC Machine is shown in the figure. The isometric view
of the Bobbin with field winding is also shown. Assemble the units and show half sectional elevation of the assembly and the plan.
Hints: Make the preparatory sketch after carefully studying the pole and bobbin with winding. Sharp corners are to be drawn with ‘fillet’ command. Bobbin edges will be seen in the plan. The winding will not be seen in plan and hence shown in dotted line.
Problem-4
Draw the Armature stamping of a DC Machine with the following dimensions- Rotor Outside Diameter = 110 mm
Rotor Shaft diameter = 25 mm
Number of armature slots = 32 Slot Dimension = 4 mm x 20 mm Show the key way in the stamping.
Hints: Armature core is made up of thin stampings which are blanked out from 0.5 mm thick cold rolled non grain oriented (CRNGO) steel sheet. The slots are made using cropping tools.
Draw the centre lines. Draw the OD and ID of the stamping. To draw the slot, consider the angle subtended by one slot pitch at the centre, viz, 360/32 = 11.25 0. Draw the slot with respect to centre line with the given dimensions. Retain the arc as shown in the enlarged slot diagram. Then using polar array form the stamping with 32 slots distributed over 3600.Draw the key way in rotor ID.
In this design, the armature core will be directly assembled on the shaft.
Problem-5
Armature diameter = 380 mm No. of Slots = 36
Slot Dimension = 15 mm x 35 mm Stamping Inside Diameter = 250mm
DC Machine Diameter = 80 mm
Draw the armature stamping. Furnish comment on providing spider/ hub
Hints: The method of drawing is similar to steps given in problem-4. Here, it is to be observed that the core behind the slot is very less. This is the case with DC Machines having large number of poles. The core is assembled on an intermediate piece, known as spider or hub. The ID of spider or hub will sit on the shaft and the stamping will sit on the OD. To arrest the radial displacement, suitable arrangement like thin circular, dove- tail or rectangular bar can be used. Provide suitable grooves for this purpose.
Two types of intermediate supports for holding the core on the shaft are given in Figure- 13 and Figure-14. Problem-6 illustrates an example where the armature core is directly mounted on shaft. Problem-7 and Problem-8 deal with spider and hub assembled armature core, respectively.
Problem-6
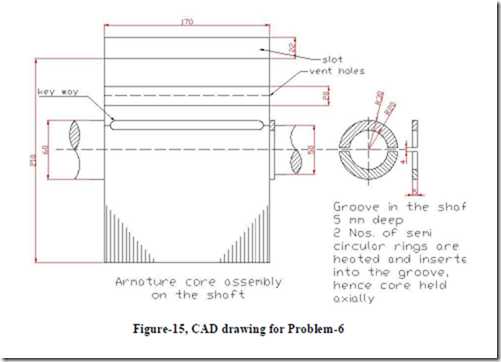
Draw the assembly of stampings to form the armature core on the shaft. The details are
given below-
OD of the stamping = 230 mm
ID of the stamping = 50 mm Slot size = 8mm x 22 mm No. of slots = 32
Armature core length = 170 mm
6 nos. of vent holes of 20 mm dia, on pitch circle dia of 110 mm Key way dimensions = 14 mm x 9 mm
Assume suitable collar on one side of the shaft and groove on the other side of the core for fixing the core axially.
Hints: Armature is resting against a raised collar on the shaft on the left hand side. On the right hand side a groove is made in the shaft. In this groove two semi circular washers are inserted. If necessary the washers are tag welded to the shaft. This arrangement ensures arrest of axial movement of the core. The key on the shadt ensures arresting of radial movement.
Problem-8
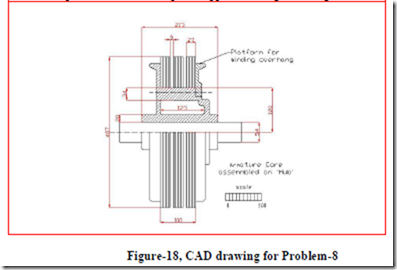
Draw suitable HUB and CORE assembly to accommodate the following requirements- Stamping OD = 407 mm
Stamping ID = 240 mm
Core packets = 3 of 27 mm thickness
‘H’ piece = 2 of 9 mm thickness Shaft diameter = 54 mm
Figure-17, H piece, which is assembled in between two core packets as spacers
Hints:
It is to be noted that the steel hub consists of two parts.
The left hand part is seated on the shaft on key way.
After the assembly of core packet and H plates are over, the smaller clamp is placed and
the bolts are holding the unit securely
Problem-9
The stamping of DC Machine armature has an OD of 240mm and ID of 74 mm. Vent holes = 6 Nos. 20 mm dia on a PCD of 120 mm.
The core packet thickness = 36, 42, 36,36,36,42 mm respectively.
5 nos. of ‘H’ pieces of thickness of 12 mm are provided in between the core packets, for cooling.
The commutator dimensions are given below-
On segments, 150 mm dia On riser, 200 mm dia
Axial length,95 mm, Riser width, 12 mm Commutator ID = 50 mm
Distance between core and commutator surfaces, 54 mm Draw the longitudinal view showing the above details.
Hints:
The problem consists of two parts –
i) Placement of core
ii) Placement of commutator
Better to draw the stamping drawing for guidance purpose
Projection in the elevation is derived from thereof and the core packets and H pieces are assembled.
Draw the commutator profile with given dimension at the given distance. The collar and grooves are not shown in the figure.
This sub-assembly helps to decide the shaft diameters and tolerances at the appropriate locations.
Figure-19, CAD drawing for Problem-9
Problem-10
Draw the commutator in half sectional elevation and half sectional end view. Assume
suitable fillets for sharp corners. Mica insulation thickness = 1 mm. Assemble the given parts-
· Copper segment
· End clamps or jaws
· Screwed cylindrical nut
Problem-11
The parts of a commutator are shown in the Figure-22, along with dimensions.
Draw half sectional end view and half sectional elevation of the assembled commutator.
Figure-22, Parts of commutator
Figure-23, CAD drawing for Problem-11
Problem-12
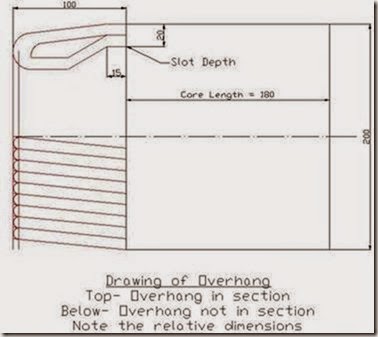
The details of an armature and commutator of a DC Machine are as follows – Armature diameter = 410 mm, Shaft diameter = 90mm, Armature core length = 250mm, Number of ventilating ducts (H Piece) =2, Width =10 mm, Axial holes in the armature core = 8 numbers of 15 mm diameter, Number of armature slots = 48,
Winding overhang on either side of armature =108mm, 144 mm respectively Diameter of Commutator = 270 mm, Number of commutator segments = 144, Total length of commutator = 150 mm.
The Armature core is positioned by two cast iron flanges, which also acts as winding over-hang support. One flange is butting on the shoulder on the shaft. The other is secured by means of a ring nut screwed to the shaft. This prevents axial movement of armature. The armature is keyed to the shaft to prevent radial movement. Draw the half sectional longitudinal view of the armature, showing the winding over hang, ventilating ducts, over-hang and end plates. Show the commutator without sectioning.
Figure-24, Hints for drawing of Overhang
Figure-25, CAD drawing for Problem-12
Problem-13
Draw the General Assembly of a DC Machine in end view. The machine has the following data-
Rating: 18.5 kW, 4 Pole, 220 v, 1500 rpm
Armature diameter = 0.18 m Core length = 0.2 m
36 slots of dimension 8mm x 24 mm Shaft diameter = 55 mm
Pole arc/ Pole pitch = 0.6666 Pole height = 65 mm
Pole width = 60 mm Yoke Thickness = 35 mm
Air gap between stator and rotor = 2 mm i)The armature is directly resting on the shaft.
ii)10 Nos. of ventilating holes, on a PCD of 96mm
Hints:
Draw pole with yoke sub-assembly.
Also show the field winding with suitable depth and height.
Take polar array to show all the 4 poles. Delete the poles in the bottom half.
Use M10 bolts for fixing.
Use zoom window and zoom all wherever necessary.
Take up armature stamping drawing.
Draw the slot profile of 6x24 mm dimension, confining the details within an angular arc of 10 0 (i.e.360/ 36) on a radius of 180 mm.
Take polar array to show all 36 slots. Delete the slots in the bottom half.
On the shaft, show half key way, for a key of 16mmx10mm.
Concentrate on the un-sectioned bottom half of the drawing. Half of END SHIELD will be seen.
The wire mesh opening is for ventilation.
End shield is attached to the yoke through bolts.
Show the FOOT and the bracket butting the housing.
Figure-26, CAD drawing for Problem-13
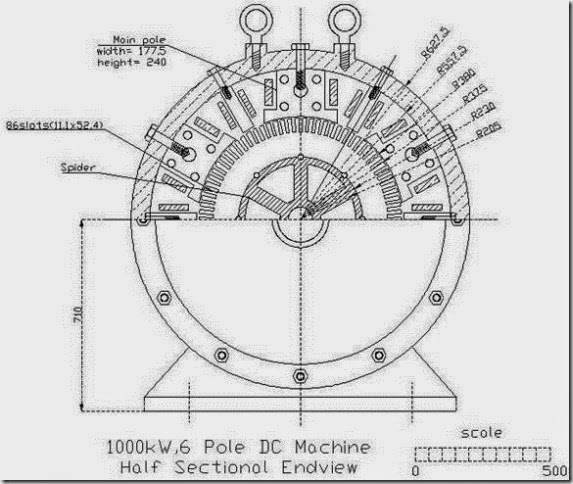
Problem – 14
Draw the half sectional end view of a 1000kW,500 V,1250 rpm, 6 Pole DC shunt generator with the following data-
Diameter of armature = 750mm
Length = 278 mm No. of slots = 86
Size of slot = 11.1x 52.4 mm
Depth of iron behind slot = 92.6 mm
Air gap length between Stator & Rotor = 5 mm
Main Pole – Breadth=177.5 mm,
Height = 240 mm
Central Rod = 50 mm dia
Pole Arc/Pole Pitch = 0.7 Inter Pole – Breadth = 46.3 mm
Height = 237 mm Air Gap = 8 mm
Thickness of Yoke = 75 mm Length of yoke = 400 mm
Shaft dia = 90 mm Commutator –
No. of Segments = 344
Diameter of Commutator = 560 mm
Length of Commutator = 123.5 mm Segment Pitch = 5.1 mm
No. of Brushes/Spindle = 3.
Hints:
Draw the main pole arc, choosing dia at pole periphery as 760mm and subtending an angle of 42 deg., complete pole profile.
Draw the inter pole at the mid of pole pitch.
Draw the field windings (assume the depth and height of the winding).
Polar array- get all 6 sets of poles, then delete the bottom half poles, retaining only the
poles seen in top half.
Draw the armature stamping, slots, and the semicircular holes at the inner diameter, to
facilitate assembling the same on to the spider.
Choose reasonable thicknesses so as to complete the half spider (6 No. of spokes
selected)
Complete the lower end shield and foot.
Show title, scale and dimensions.
Figure-27, CAD drawing for Problem-14
Problem-15
Draw the half sectional end view and half sectional elevation, showing the General
Assembly of the DC Generator, rated as 30 kW, 4 Pole, 1200 rpm Shaft radius = 35 mm,
Armature radius = 110 mm, Armature core length = 210 mm, Inner radius of the yoke = 168 mm, Outer radius of yoke = 195 mm,
• Pole width = 65 mm, pole height = 66 mm, Pole arc/ pole pitch = 2/3, Steel rod in the main pole = 40 x 40 mm,
• Inter pole dimension = 20 x 52 mm,
• No. of armature slots = 32,
• slot dimension = 8 x 22 mm,
• Vent holes = 6 of 10 mm dia,
• Axle height = 200 mm
• Commutator dia = 110 mm
• Commutator length = 90 mm
Hints:
Assume data not given Make a preparatory sketch.
Almost all details of active materials are given
The dimensions of fan, end shield, over hang length, supporting bracket, have to be
assumed.
Referances:
Figure-28, CAD drawing for Problem-15
1. Performance and Design of Direct Current Machines, AE Clayton and NN Hancock, CBS Publishers and distributors, 2002
2. Electrical Engineering Drawing, KL Narang, Satya Prakashan, New Delhi,2001
3. Electrical Drafting, SF Devalapur, Eastern Book Promoters, Belgaum, 2006
4. CAD for Electrical Engineers, MS Indira, VD Sankarlal, D Beula, Fillip Learning- Elsevier, 2013
5. Materials from Google.com












Comments
Post a Comment